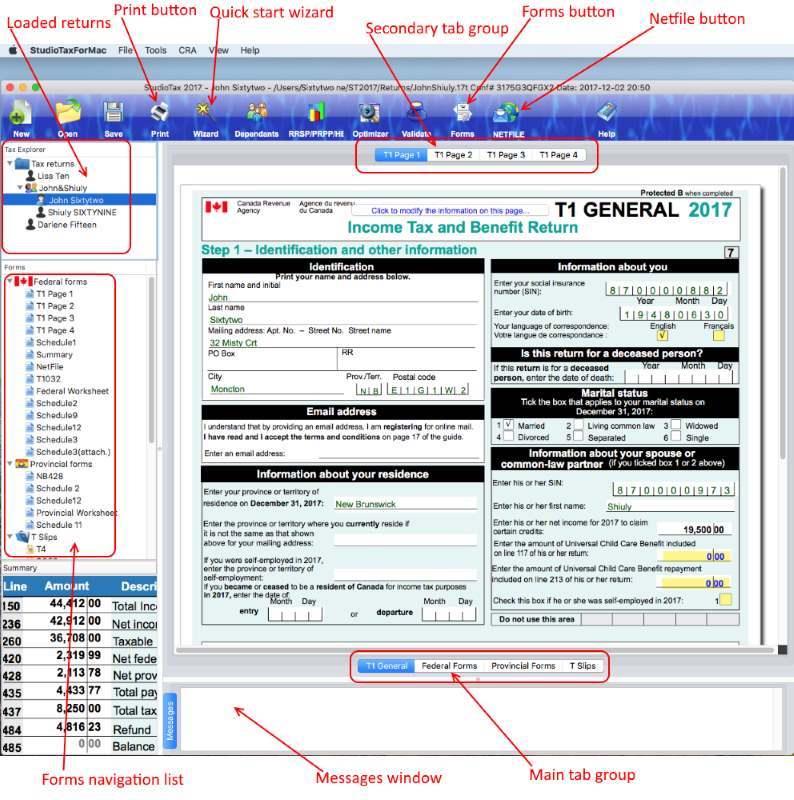
You may need to directly edit the tax information using the tax forms. StudioTax contains multiple tabbed windows to optimize the use of your screen. The tabbed windows are divided under 2 tab groups:
1) A main tab group shown at the bottom of the picture
2) A secondary tab group shown at the top of the picture
The main tab group contains the following tabs:
T1 General: contains the 4 main T1 general tax pages.
Federal Forms: contains all federal schedules and forms such as schedule 1, T778 etc.
Provincial Forms: contains all the provincial schedules and forms such as forms 428 and 479.
T Slips: contains supported T slips
Help: contain StudioTax help.
Each secondary tab group belongs to a main tab and contains the schedules and forms of that main tab. For example, Schedule 1 tab can be found in the first tab of the Federal Forms tab group.
You can add a new form by clicking the Forms button on the Tool bar. A forms dialog containing the list of Federal and Provincial forms appears. Use the forms dialog to add and remove forms. Once a form is added, it appears under the associated main tab group. For example, if you add Schedule 5, the associated form is added to the Federal Forms main tab.
Note that adding a new form will not necessary make that form part of your return. Only forms that contain tax information will be printed, and forms that have tax relevant information but are not added to the main tabs will be added to your return and printed.
You can also add new forms by double-clicking on linked
fields. If a linked field refers to a non-loaded form, double-clicking on that
field adds the form to the proper main tab. For example, if you double-click
line 323 of Schedule 1, Schedule 11 loads and the focus will be set to schedule
11.
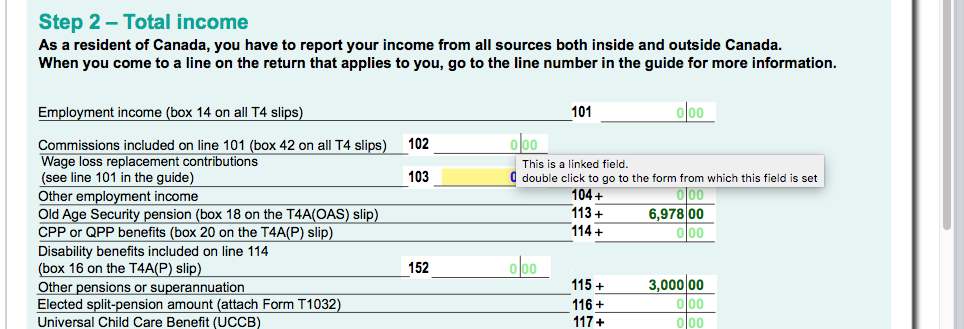
StudioTax forms contain three different field types:
Input fields: can be used to directly enter various amounts. The amounts in these fields appear in blue with a yellow background; no value is displayed if the value is zero or not entered.
Output only fields: these are computed fields, which you cannot modify. The values of these fields are displayed in green. Fields with zero values are also displayed.
Linked fields: these fields get their values from other forms, and are displayed in bold green. A tool tip window pops up when you move the mouse cursor over these the linked fields. Double-click the left mouse button to navigate to the linked form.
StudioTax supports most T1 general forms. The following forms are always displayed:
You can add the rest of the forms by using the Forms button on the tool bar or by double-clicking a linked field.
Note: StudioTax forms are a true replica of the original CRA forms. Special effort has been made to make StudioTax forms and their content as close as possible to CRA printed forms. StudioTax reproduces only the forms needed to enter tax information and required by Netfile returns and/or printed returns. As a result, you may see an instruction similar to “For more information, see the back of this form”. In that case, either the additional information is in the next page of a multi-page form or you need to refer to the CRA printed forms of the same name or refer to the printed guides.
To enter your T slips information such as T4, T5 etc., go to the T Slips main tab and click the button for the given T slip. Enter the amounts shown on your paper T Slip in the corresponding boxes listed in StudioTax T Slip form. If you have more than one paper slip of the same TSlip, use the blue arrow on the header of the TSlip form to move to the next TSlip.